|
Stuff needed:
-
3" PVC Pipe from your local home improvement
store
-
3" PVC elbow (the long version with one lobe
already taken off, or you can cut it off if you get the 2 lobe
version) 3" to 3" rubber connection (It has rubber
hose fasteners on each side) (You'll find it where you find the PVC,
probably on the same isle. It might be a little bigger and this is
okay as long as it has the ability to tighten to 3")
-
3 rubber hose fasteners
-
Black heat resistant paint
-
K&N filter part #DFM9601C. It's a 9 inch conical.
Costs $37.95...find it at http://www.thefordsource.com/store/motorsports/induction_3.htm
-
A drill w/bit and some self-tapping screws
My procedure:
-
Take out the entire airbox to throttle body assembly
(including the rubber boot that connects to the throttle body)
-
The metal post that is left after you take out the air
cleaner assembly unscrews, so take that out too.
Unbolt the smog canister and remove its holder.
-
You should now see two relays on the sides of your now
empty pocket of the car.
These relays are to be moved to the bottom of the pocket (where the
smog canister holder once sat)
-
Use the self-tapping screws to secure the two relays
to the bottom.
Take the smog canister and move it as close to the radiator as you can
and tuck it into the corner. This canister must remain upright to
properly do its job.
-
Mark the spot for the holes to secure the canister,
and drill. I used a bolt from the smog canister holder to secure the
smog canister in this position and put some sand paper foam under the
smog canister to keep it from vibrating.
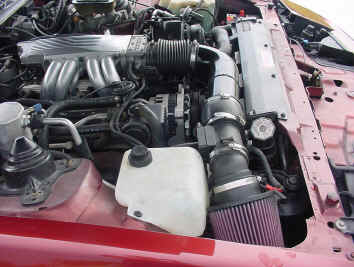
Now we can begin assembling the intake...
-
Use wd-40 or something slick to grease up the throttle
body boot (the side connecting to the airbox) and slide the PVC elbow
in (if you bought the 2 lobed elbow, you will need to cut off one of
the lobes) and then use a rubber hose fastener (you will be replacing
the oval shaped one already on the boot) and tighten it to the elbow
-
Take the PVC pipe and cut about 9 inches of it off.
-
Connect the 2 (elbow and 9 inch pipe)
-
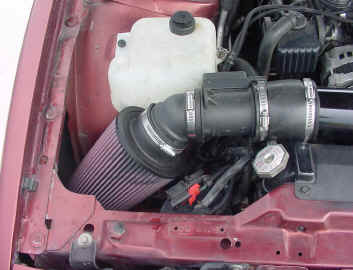
Next, take the MAF and on the side that faces the
throttle body, connect the 3" to 3" rubber fitting and
tighten it.
-
Take your PVC pipe (now connected to the elbow and
boot) and slide it ALL the way into the 3" to 3" rubber
fitting. It should be about 1 cm from the MAF when ALL the way slid
in. Tighten.
-
On your old airbox assembly, between the air cleaner
holder and the MAF was a hard plastic bend. Take this off of the air
cleaner assembly (be very careful not to chip or break this bend, as I
did)
-
Place one end of this bend into the K&N filter and
the other onto your MAF. Take 2 rubber hose fasteners and tighten the
connections.
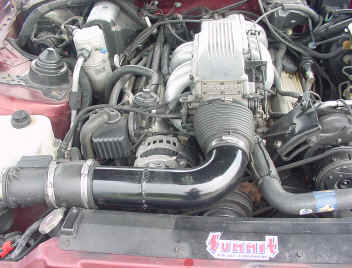
Do not stop at the PVC version!
read on...
This assembly should fit almost in the opening in the
fender, but since the cone is big, it does not. This PVC setup is for
trial fit purposes and it is not recommended by me to stop here. The next
step is to take your car to an exhaust shop and have them fit a 3
1/2" bend to a piece of pipe, weld it, and (you) paint it. This looks
much nicer, flow better, doesn't melt at high temps, has no smell, will
last forever, is not cheapo PVC pipe, and only costs another 30 bucks.
This brings your total investment to about 65 - 70 bucks, depending on the
labor charge of the welding. Much better looking and sounding than that
200 dollar setup from SLP. You will hear a very audible hissing noise
coming from the filter. This is normal and a GOOD sound. That's the sound
of your engine actually breathing compared to that factory piece of junk.
Your engine (if it's like mine) will now pull harder at higher rpms, run a
little cooler, and the exhaust note changes a little too.
|
 <for
more info on my car
<for
more info on my car